Showing posts with label Recipes. Show all posts

Sunday, June 1, 2014

Strawberry Glaze Pie Recipe


I love looking through my Momma's old cookbooks.  They're like time capsules.  Our old address and phone number written in the inside covers - along with my Momma's name {always written in the traditional fashion of Mrs. James A. P...}.  Receipts, recipes from the electric cooperative newsletter, a list of tips entitled "Are Your Kids Driving You Crazy" {LOL!}.


But, I went looking for a strawberry dessert to satisfy the wishes of the Mr. and the kids.  I found this Strawberry Glaze Pie recipe submitted by Mrs. Henry Lustgarten from Wilmette, IL.  The recipe is from the cookbook, "Favorite Recipes of America:  Desserts" copyright 1966.


1 1/2 quart fresh strawberries
1 9-in pie shell {deep dish}, baked according to package directions
1/2 cup water
1 cup sugar
3 tablespoons cornstarch
2 tablespoons butter
red food coloring {optional}

Wash, drain and hull strawberries.  Place 1 quart of berries in baked and cooled pastry shell.  Crush remaining berries {while the original recipe says "crush", you really need to puree the strawberries in order to make the glaze}.  Combine pureed berries with water, sugar and cornstarch in a saucepan.  Boil for 2 minutes or until clear.  Add butter and enough food coloring to give a bright red color {I found the food coloring was not needed}.  Spoon glaze {slightly cooled} over berries in pie shell, making sure that all berries are covered.  Cool {in refrigerator until set}  Cover with whipped cream before serving.

Mary Ellen note:  Some of my glaze did not make it all the way to the bottom layer of fresh berries, though that did not in anyway diminish the taste!  Next time, I will probably add a layer of glaze to the bottom of the cooled pie shell before adding the fresh berries.  Or maybe a layer of whipped cream.  Or both!  I don't think there's a wrong answer when it comes to strawberries and whipped cream LOL!  

Enjoy!

Mary Ellen    

Sunday, December 22, 2013

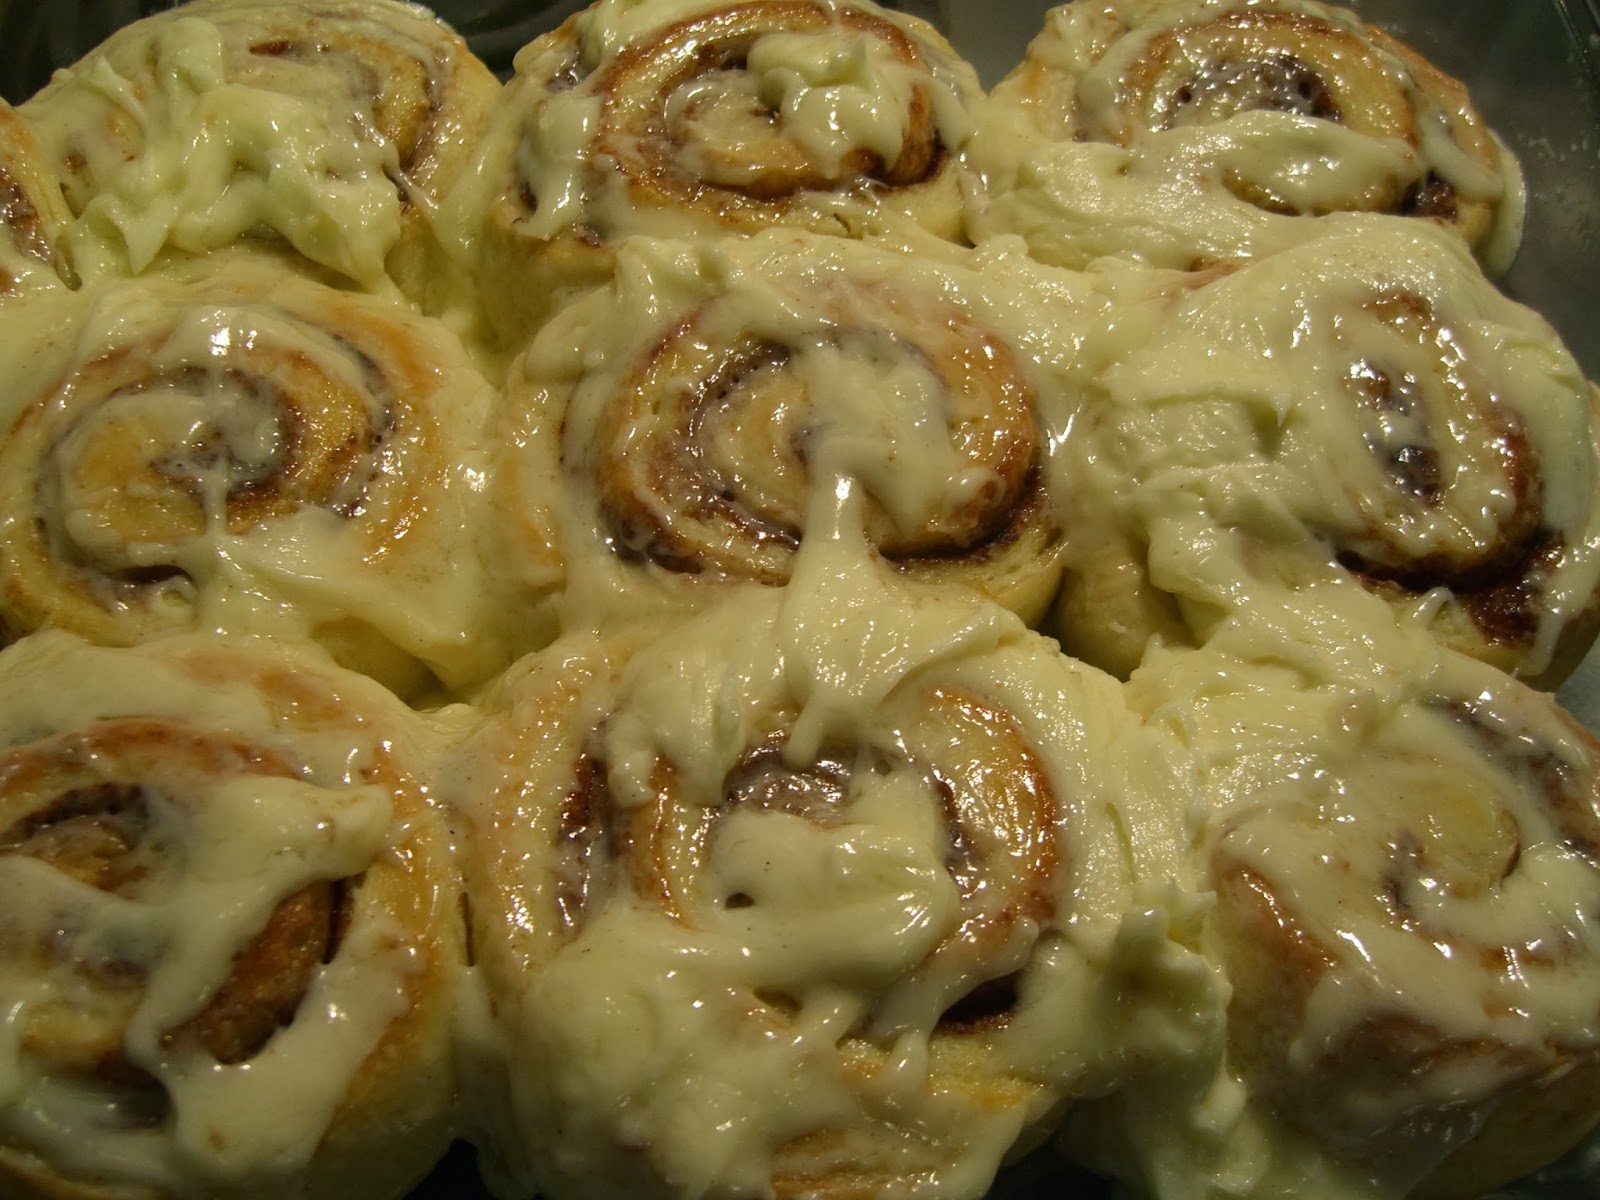
Sweet Holiday Treat - Homemade Cinnamon Rolls


Homemade cinnamon rolls warm from the oven!
 
 
When my husband and I first married, I could barely boil water!  But after 13 years of "on the job training", I've become pretty good in the kitchen.  Or, at least no one complains (except when I make lentils!).  One of my husband's favorites are these homemade cinnamon rolls with cream cheese frosting.  He always requests a batch for office parties.  It makes me feel good that he's proud of my kitchen creations. 
 
 
Cinnamon Rolls with Cream Cheese Frosting
 
Ingredients:
 
1 package dry yeast
1 cup warm milk
1/2 cup sugar
1/3 cup oil
2 eggs
4 cups all-purpose flour
 
for filling:  cinnamon, brown sugar and 2 - 3 tablespoons melted butter
 
-Dissolve yeast in warm milk {I add 2 tsp of sugar to a measuring cup, pour in the warm milk, then add the yeast.  I allow the yeast to proof for 5 minutes before combining with other ingredients}
 
-In mixing bowl, combine flour, sugar, oil and eggs.  Blend together using paddle attachment.  Add in yeast-milk mixture.  As ingredients begin to incorporate, switch to dough hook attachment to finish the kneading. 
 
-Place dough in a bowl, cover and allow to rise for 1 hour or until dough has doubled. {see tip #3 here for my dough rising technique}
 
-Roll out dough on floured surface.  Spread melted butter over the dough, then evenly sprinkle with cinnamon and brown sugar.
 
-Working from the long edge, carefully roll the dough down to the bottom edge.
 
-Cut dough into 1 inch slices and place in lightly greased baking pan.
 
-Bake for 10 - 15 minutes at 400 degrees.


Cream Cheese Frosting ingredients:
 
8 tablespoons butter, softened
1-1/2 cup powdered sugar
2 oz. cream cheese, softened
1/2 teaspoon vanilla
 
-Combine frosting ingredients in mixing bowl.  Beat well with electric mixer until fluffy.  Spread generously on warm rolls.


When I'm preparing these rolls for breakfast or hubby's office parties, I assemble the rolls the night before, refrigerate overnight and bake the next morning.  Ensuring they will be delivered to his office nice and warm!
 
 
Enjoy!
 
 
Mary Ellen

Saturday, November 9, 2013

Good Morning Green Smoothie


Looking to add more greens to your day?  Try my Good Morning Green Smoothie


Start with a generous handful of kale.  I never measure, but aim for filling the container until it is 3/4 full with kale.

 
To the kale, add spinach.  Fill it to the top!


Next, add frozen mango chunks.  Then, add about 1 cup of cold water and a splash of orange juice.  If you prefer less sugar from the juice, add a medium orange (peeled) instead.  And, then my favorite part - a small lemon, peeled.  I just love the scent of lemon in the mornings!  Such a refreshing wake me up! 
 
 
To peel the lemon (and orange if using), cut the ends off.  Then, slice around the lemon removing the peel.  Don't worry about the seeds - the Vitamix will take care of those!


Turn the Vitamix on low, then slowly increase the speed until all greens are completely blended.  And that, is the basis of my Good Morning Green Smoothie!  Guaranteed to win over those reluctant to try green smoothies - like my Momma.  She now has a green smoothie every morning!

 
I have recently started adding these two healthful additions to my green smoothie, spirulina and organic maca root powder.  Spirulina is a blue-green algae rich in antioxidants and vitamins.  It boosts energy and immunity.  Maca is a Peruvian root vegetable.  It aids hormonal function and was traditionally used as a libido and fertility booster ;)     
 
Mary Ellen


Thursday, July 4, 2013

Patriotic Marshmallow Flags


A fun and festive project for the kids on the 4th - patriotic marshmallow flags!  I came across this cute idea as I was thumbing through an issue of Kraft Food & Family.  Start with the new Jet-Puffed StackerMallows (they're flatter than regular marshmallows).  


Using blue and red frosting tubes, draw the canton and stripes.  Then, add star-shaped sprinkles! 
 
 
HAPPY FOURTH OF JULY!


Image


Thursday, May 30, 2013

{Recipe Repost} Strawberry Vanilla Jam


strawberry vanilla jam, strawberry jam


It's strawberry season!  On Mother's Day, we took a trip out to Vollmer Farm in Bunn, NC, to pick local, organically grown strawberries.  The kids always enjoy spending time at the farm (especially the Back Forty playground!).  And back home, I enjoy turning some of our fresh picked bounty into yummy Strawberry Vanilla Jam!


Rinse, hull and slice your strawberries.  You will need 5 cups of crushed berries for the jam.  I add the sliced strawberries to my Vitamix and pulse quickly, working in several small batches until I have the needed amount.  


Add the crushed strawberries to a stainless steel saucepan along with 4 tablespoons of lemon juice, a 1/2 teaspoon of butter (helps to reduce foaming) and half a vanilla bean, split in half lengthwise.  Whisk in pectin (1 - 1 1/2 boxes or 9 tablespoons).  Bring to a full rolling boil over high heat, stirring frequently.   


Next, add 7 cups of sugar (all at once), stirring constantly.  Return the mixture to a full rolling boil that cannot be stirred down.  Boil hard, stirring constantly, for 1 minute.  Remove from heat.  Using a large slotted metal spoon, skim off any foam.  Remove the vanilla bean.

Nota Bene:  Visit the Fresh Preserving website for instructions on how to prep jars and lids and for basic water bath canning procedures.

Add hot jam to prepared canning jars, leaving 1/4 inch headspace.

Process jars in a water bath canner for 10 minutes, adjusting for altitude.  When processing time is done, turn off heat and remove the lid from canner.  Allow jars to rest in canner for 5 minutes.  Carefully remove jars from canner without tilting.  Place jars upright on a towel in a draft-free area and let cool, undisturbed for 24 hours.

After 24 hours, check lids for seal before placing in pantry.  If jars did not seal properly, refrigerate immediately or reprocess.  


Mary Ellen

Disclosure

Monday, May 27, 2013

In the Kitchen - Red, White & Blue Strawberries


The kids joined me in the kitchen for a fun Memorial Day treat - Red, White & Blue Strawberries!  I found the idea and recipe on Pinterest, of course!

 
Ashleigh & Reed dipping our strawberries in melted white chocolate

 
The strawberries set aside to harden after the first dipping

 
I didn't have the blue sprinkles as called for the recipe.  But, sugar mixed with a few drops of blue food coloring work just the same!

 
Clayton adding the blue sprinkles


After we finished dipping the strawberries, it seemed a shame to let the leftover melted chocolate go to waste.  So, I took some store bought crème filled cookies and dipped them in the white chocolate!


Waste not, want not :)
 

Happy Memorial Day!

Mary Ellen

Sunday, May 5, 2013

{Repost} Easy Guacamole for Cinco de Mayo!


We'll be enjoying some easy Mexican inspired dishes today!  The Pioneer Woman's very easy - and very delicious - Beef & Bean Burritos.  And of course, I'll be making homemade guacamole using this recipe from the Gluten Free Goddess.   This guacamole is light and fresh and has no onions, which is a bonus because our little Ashleigh Girl avoids anything with onions or even the hint of onions! 
 
For the gauc, I add 2 -3 diced avocados, 1 garlic clove, 10 grape tomatoes (halved), lime juice and some fresh cilantro to my Vitamix and blend until slightly smooth.  Then, it's ready to enjoy!
 
Mary Ellen  


Disclosure     


Wednesday, April 17, 2013

Homemade Slime - Frugal Fun for the Kids!

I spent much of Sunday afternoon in the kitchen making among other things, slime for Clayton's upcoming class project.  The entire second grade is creating a "mall" where the students can buy and sell products at their own "stores".  When Ashleigh was in second grade, we made ribbon covered hair clips.  This time around with Clayton, it's slime!

The kids enjoyed the project and it was super easy!  And, exactly like the slime I used to buy as a kid from the bubblegum machine for 25 cents!


Homemade Slime:

Materials needed:
Borax
White glue (the inexpensive glue works fine.  I picked up several bottles of white glue at Kroger's for .69 each)
Food coloring

Step 1:  In a bowl, mix 1 tablespoon of borax with 1 cup of water.  Stir until the borax is dissolved.

Step 2:  In another bowl, mix 1/2 cup of glue with 1/2 cup of water.  Add a few drops of food coloring.  Mix until smooth.

Step 3:  In a third bowl, combine 1/4 cup of the borax+water mixture with 1/4 cup of the glue+water mixture.  Stir; the slime will begin to form immediately.  Let the slime sit for 5 minutes.  Afterwards, pour off excess water and knead slime until it starts to firm and feels "springy".  

Repeat steps for additional batches.  We were able to make 4 batches of slime with this recipe.

*****

You can find this and other frugal fun recipes in The Dining On A Dime Cookbook{currently on sale for 50% off now thru Monday, April 22nd!}  Order by Wednesday to receive a FREE bonus - Menus from Dining On A Dime menu planner (free with any order on Tuesday & Wednesday). 


Sunday, April 14, 2013

Busy Day in the Kitchen


A busy day in the kitchen....homemade cinnamon rolls this morning for breakfast.  The Pioneer Woman's Blackberry Cobbler this afternoon.
 

Currently, making 20 batches of slime (yes, slime!) for Clayton's class project.  And later for supper, Indian Roast Chicken from Bal Arneson (The Spice Goddess).


What's cooking in your kitchen today?  

Mary Ellen


Saturday, March 30, 2013

{Repost} Dijon Pineapple Glazed Ham Recipe

 
Bone-in Ham with Dijon Pineapple Glaze
 
I've shared this recipe before as it is a family favorite and my go-to recipe for glazed ham.  But, with Easter right around the corner (tomorrow!!!) I wanted to make it available again.  I still have to run out to the store and buy a ham myself.  Hopefully, there are still some left!
 
 
Dijon-Pineapple Glaze
(adapted from Kraft Foods recipe)

1 cup brown sugar

1/2 cup maple syrup or honey (I've also used the glaze packet included with the ham for the syrup)

1/4 cup Dijon mustard

1 can crushed pineapple, with juice (I chop up frozen pineapple or canned pineapple chunks in my Vitamix)

1 tablespoon corn starch

whole cloves

Maraschino cherries, halved (optional)

 Heat oven to temperature listed in cooking directions included with the ham.  Mix syrup, sugar and mustard until blended.  Spread a portion of the glaze over the ham.  Add cloves and cherries to the top of the ham.  Bake ham according to directions.

Before the ham is done cooking, combine remaining glaze with corn starch and crushed pineapple in a saucepan.  Bring to a boil over medium-high heat.  Cook and stir over medium-low heat for 5 minutes or until thickened.  Serve sauce alongside ham.
 
Mary Ellen

Disclosure


Friday, March 29, 2013

{Repost} Decorating Easter Eggs


An oldie but goodie - inexpensive ways to decorate Easter eggs, along with ideas for creating your own natural dyes.  Please enjoy these tips from the ladies at Living On A Dime!

Before decorating Easter eggs, cover the entire table with newspaper. Keep a huge roll of paper towels or rags handy for messes. Have each kid wear one of dad's old (now disposable) tee shirts.

Making Easter Egg Stands
Cut toilet paper roll cores into one inch cylinders and use for egg stands. Decorate with stickers or paint.

Decorating Easter Eggs

Traditional Method
Hard boil eggs. Fill several mugs with boiling water and add 1-2 tsp. vinegar. Place a few drops of desired food coloring in each mug. Place eggs in mugs for several minutes until eggs reach desired shades.

Remove with a spoon. Place on paper towel to dry. When dry, polish with a small amount of shortening on a paper towel. Buff until glossy.

You can draw or write on the eggs with a light colored or white crayon before dipping. The drawing will remain white after the egg is dipped.

To clean out mugs, put a little bleach water in the cups and soak for a few minutes.


Glitter Eggs - Place 1 tablespoon each of glue and water in a cup. Stir the mixture and then paint the eggs with it. Sprinkle with glitter. This can also add sparkle to already dyed eggs!

Decoupaged Eggs - Tear small pieces of wrapping paper, napkins, stickers, or clip art. Mix equal amounts of glue and water. Paint egg with glue mixture. Place paper on top and then cover with more glue mixture. Let dry.

Spotted Eggs - Place 1 tsp. of cooking oil in dye. Dip the egg. The oil will cause the dye to make an irregular pattern on the egg.

Waxed Eggs - Dip a portion of the eggs in melted paraffin or candle wax. Then dip them in the dye. Remove from dye. Dry and peel off the wax. The egg will be white on one half and colored on the other half. You can also dip in dye before waxing to get two colors.

Hollow Eggs - Poke a hole in one end of an egg with a very small needle. Poke another slightly larger hole in the other end. Then blow on the small end and the egg will come out the other side. Decorate Easter eggs as desired.


Natural Easter Egg Dyes
If you would like to try decorating Easter eggs with natural dyes, try the following:
  • Yellow-- yellow onion skins, turmeric (1/2 tsp. per cup water) celery leaves
  • Orange--any yellow dye plus beet juice
  • Red--beets, paprika, red onion skins
  • Pink--cranberry juice
  • Blue--blackberries, grape juice concentrate, red cabbage
  • Brown--black tea, white oak, juniper berry, coffee, barberry
  • Light purple--blackberries, grapes, violets
  • Green--alfalfa, spinach, kale, violet blossom plus 1/4 tsp. baking soda, tansy, nettle, chervil, sorrel, parsley, carrot tops, beet tops or dip yellow egg in blue dye

Hard boil eggs with 1 tsp. vinegar in the water. Place dying ingredients in non-aluminum pans, cover with water and boil 5 minutes to 1 hour until desired color is achieved. Use enough material to make at least 1 cup dye. Crush ingredients as they boil to extract as much dye as possible. Strain the dye. Most dyes should be used hot. Let each egg sit in the dye until it reaches the desired color. Some dyes will take longer than others to make the desired colored on the egg. Remove the egg and let dry.

*****


Jill Cooper and Tawra Kellam are frugal living experts and the authors of the Dining On A Dime Cookbook. Dining On A Dime will help you save money on groceries and get out of debt by cooking quick and simple homemade meals. For free tips & recipes visit http://www.LivingOnADime.com , sign up for our free Living On A Dime Newsletter and learn to save more!


Saturday, February 16, 2013

Saturday Simple Pleasure


Today, I got to indulge in one of my favorite simple pleasures - watching snow fall!  Big, fluffy flakes of snow started falling here much earlier than expected.  I've spent all day looking out the window with wonderment!  I couldn't imagine a more perfect winter's day.  All cozy in the house, with no place to be, yummy delights warm from the oven, just watching the snow fall!   
 
 
Mary Ellen


Tuesday, January 29, 2013

Snow Day (featuring Homemade Caramel Popcorn!)


Well, our snow day last week turned into more of an "ice" day - bummer!  Our area received just a dusting of snow before the precipitation changed to sleet and freezing rain.  Thankfully, we all made it home safely.  And, luckily the area avoided the havoc of 8 years ago when a similar weather event resulted in complete gridlock on the interstate and kids stranded at school overnight. 


But, even a less than snowy, snow day calls for our favorite snow day treat - homemade caramel popcorn!  It's a tradition in our house to snack on this deliciousness when it snows!

Homemade Caramel Popcorn
Recipe from The Complete Tightwad Gazette: Promoting Thrift as a Viable Alternative Lifestyle
by Amy Dacyczyn

3/4 cup brown sugar
1/4 cup butter
3 tablespoons corn syrup
1/4 teaspoon baking soda
1/4 teaspoon vanilla
1 cup peanuts (optional)
and popcorn, of course!

Combine brown sugar, butter and corn syrup over low heat until butter is melted.  Cook without stirring for 3 minutes.  Remove from heat.  Add baking soda and vanilla.  Spread popcorn and peanuts on a baking sheet.  Pour caramel over the popcorn and mix until evenly coated.  Bake 15 minutes at 300 degrees.


Serve warm from the oven.  YUM!

May your snow days be *!~*!~*SNOWY*!~*!~*

Mary Ellen

Tuesday, January 15, 2013

Inspiration & Oatmeal Chocolate Chip Cookie Recipe


A sweet treat for my sweet Mother-in-law!  She came by over the weekend to deliver my Christmas present which had been delayed in the rush of the holiday shipping.

Oatmeal Chocolate Chip Cookies
Recipe from Dining On A Dime Cookbook

3/4 cups shortening, softened
1 cup brown sugar
1/2 cup granulated sugar
1 egg
1/4 cup water
1 teaspoon vanilla
1 cup all-purpose flour
1/2 teaspoon baking soda
2 cups oatmeal
1 cup (or more) chocolate chips

Beat shortening, sugars, egg, water and vanilla together until creamy.  Add flour and baking soda to creamed mixture.  Blend well.  Stir in oats, then add chocolate chips.  Drop by spoonful onto greased cookie sheet.  Bake in oven preheated to 350 degrees for 12 - 15 minutes. 


Frugal Inspiration - I love those little "magazines" from the grocery stores!  Besides the store specials and recipes, they contain great ideas for creating pleasing edible arrangements for guests.  One of my favorites is Inspirations from The Fresh Market.  Great ideas for platters that I can recreate on my own for less!

Mary Ellen

Tuesday, January 1, 2013

Black-Eyed Peas & Collard Greens


A New Year's Day tradition - black-eyed peas slow cooked with kielbasa and ham (for good luck).  Collard greens seasoned with ham (for wealth).  Rice (for good health) and cornbread made from scratch (just because it tastes good!). 


Good cooking like this makes my husband glad he married a Southern girl!
Happy New Year!
Mary Ellen

Monday, December 24, 2012

Visit from Grandma-claus!


Yesterday, we were visited by my husband's mother, his siblings and their significant others.  It's always great to see his brothers and sister as they live out-of-state.  And of course, the kids always look forward to visits from Grandma!


Grandma came bearing gifts!
 
 
She brought tablets
 

and toys, much to the delight of the little ones!
 
 
The kids even got a chance to meet an actual Major League baseball player!
 
My gift is in the mail - literally!  It was delayed in all the holiday shipping.  But, I can't wait to get cooking with my new Le Creuset cookware set :)
 
Since the family came yesterday, today has been quiet and restful.  I've been busy in the kitchen prepping for our Christmas Dinner.  Making Sweet Potato Casserole and Jalapeno Coleslaw to go along with our Dijon-Pineapple Glazed Ham.  Later, we'll take a ride around and look at Christmas lights.  That's when the "elf activity" starts to pick up around our house :)  Every Christmas Eve, an elf stops by to drop off a new pair of pajamas and an ornament for the kids.  A reminder they should get to bed early tonight!
 
Mary Ellen